Friday, April 22, 2011

~ Cupcakes ~ BUNNY CUTE! Easter cupcakes for my peeps.


My daughters and I had some much fun making these cupcakes yesterday.  They turned out so cute, yummy and they were really easy to make. My daughters did most of the decorating, well actually my oldest daughter did, my little one helped, but to make a lot of mess. They sure had fun!


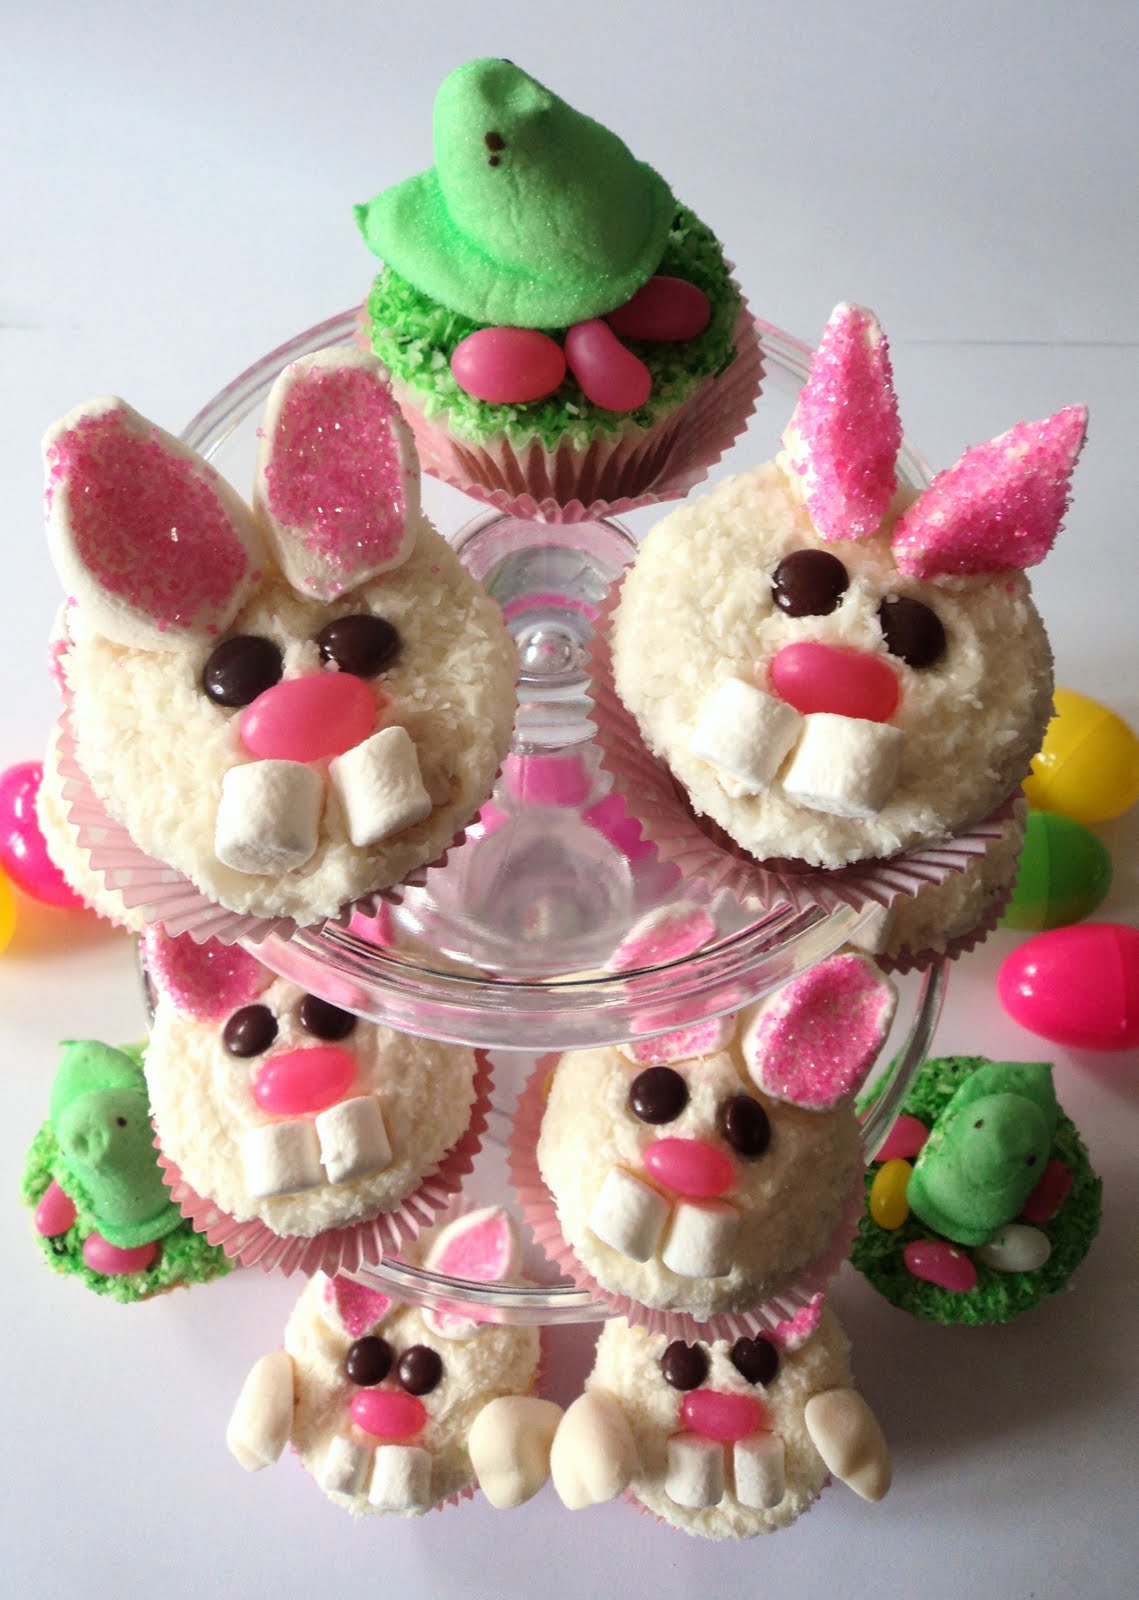
I got inspired by these cute cupcakes on the Betty Crocker website and couldn't resist to make some bunny cupcakes too.  I used coconut to give them a furry look and gave them some big bunny marshmallows teeth.

This is how we made them if you want to make them too:

- Cupcakes: When I'm baking with my daughters I prefer to use a cake box mix, it is just easier this way. I prefer the Betty Crocker brand and for these cupcakes I used the lemon cake mix, it tastes really good with the coconut and butter cream icing.

{I am not affiliated with Betty Crocker in any way, I just want to put it out there :) It's just my preferred brand of cake mixes}

- Butter Cream Icing: {I prefer to make the icing from scratch, Recipe below}

- Shredded coconut

- Marshmallows: mini and regular size

- M&M or smarties for bunny eyes

- Pink jellybeans for bunny nose

- Pink sugar for bunny ears


1.To make the bunny ears, cut one marshmallow crosswise and dip halves in pink sugar.


2. Frost the cupcake with butter cream and dip in shredded coconut. 


 3. Put a little bit of butter cream  under the marshmallows ears to stick them on the cupcake. Decorate with the rest of the candies for the eyes, nose and small marshmallows for bunny teeth.


 4. I had a few heart shaped candies and used them for some bunnies paws and tails, but they look cute without them too.


We had some Marshmallows peeps and made these ones too.


I put a few drops of green icing color in a Ziploc bag with a few drops of water and mixed in with coconut to make instant grass.  I colored the frosting green as well.

They are so adorable you feel so bad to eat them :)


Here is how to make BUTTER CREAM icing:

4 cups (500 grams) of icing sugar
3/4 cup (1 stick or 125ml) of butter, softened
1/3 cup (75ml) of milk
2 teaspoons (10 ml) of vanilla extract

In a bowl beat butter until fluffy, beat in sugar alternately with milk, making 3 additions of sugar and 2 of milk. Beat in vanilla.


HAPPY EASTER!


Tuesday, April 19, 2011

~Party Printable~ Easter Collection {Water bottle labels, Invitations, cupcake toppers and Banner} & Tutorial


My daughters and I are hosting an Easter bake Sale for charity this week.
I just finished designing the party printable collection I will use for the treats and table decor.  You can use them too if you are planning an Easter or egg hunting party this weekend..  I will post pictures of our decorated table after the event next week.

This collection includes Water bottle labels, Invitations, Banner and circle tags that can be used for cupcake toppers and treat bags.  Click on the links to download and see tutorial below. I hope you can use them, and if you do; please share your party pictures with us!


Ever wonder how to affix water bottle labels?

Remove original labels from water bottles and attach new ones using double sided tape {This is the easiest way but only works if water bottles will be served at room temperature, otherwise ink will leak from the labels}

Now if you want to make them waterproof and place them in buckets with ice, an easy and economical way, rather than buying waterproof labels, is to use clear packing tape, the width of the tape is exactly the same size as the labels. Laminate both sides of the label with the clear packing tape and then use the double sided tape to affix to the bottle.  This way the ink won't leak. 

You can also just attach the label to the bottle with double sided tape and then go over with the clear tape, you will be saving one step but only the top will be waterproof, I've done it before and my bottles were fine when placed in ice, but I recommend to make a trial run and place your bottle in a bucket with ice to check if water goes through.  But just to make sure the ink won't leak with the last method, and you still want them in ice, just insert the bottles half way where the ice cubes don't touch the labels and the water will still be kept cold.

How to do cupcake toppers, treats and favors tags:

Favors tags

 {Take a look at this post to see how to make favors and treat tags using party circles}


For cupcake toppers, download and print file, cut into squares or use an scalloped or circle 1 1/2" punch and attach to 4" lollipop sticks {available at Michaels, Waltmart or Bulk Candy store} using tape or a small white circle label.  Place in the middle of cupcakes as you can see in the picture above.  

You can make napkin rings too.  Take a look at how I made these using party circles, ribbon and double sided tape.


How to make a banner using the printable file:

Download the file and print. Cut circles using a circle cutter or scissors and a steady hand :) Make two small punches at the top of each circle and thread the banner together using your favorite ribbon.

Monday, April 18, 2011

~Party Trend~ Paris inspired Parties

I would like to say that I inspired Kim {Tomkatstudio} when she planned the fabulous Glamour Girl in Paris party for her daughter Kate a few weeks ago. It was adorable with lots of details and help from a lot of talented vendors. Exactly one year ago I designed an Ooh La La! Glam Girl A Pink Poodle in Paris to celebrate my daughter's 6th years old.   I was already obsessed with Paris after a trip to Europe a few years ago and at that time the Barbie in a Fashion Fairytale movie had just been released. I just wanted to recreate a Glamour Fashion Show in Paris and my daughter being the little fashionista she is, absolutely loved the idea.  I'm sure Kim doesn't read my blog, because she is pretty occupied serving up fabulous party inspiration over at her blog!
 Anyways I still want to believe she got inspired by my daughter's Ooh La La! Glam girl a Pink Poodle in Paris party... 

Did you know that my daughter's Ooh La La Glam girl a Pink Poodle in Paris is the most popular post in my blog?  Over 1000 unique page views in only 3 months, over 800 just last month ago.  It seem everybody is looking for some french inspiration these days...


Here are I leave you with some eye candy and more fabulous Paris inspired parties... 

{Kate’s 4th Birthday Party} Glamour Girl in Paris…. A Barbie Inspired Party!


If you are planning a French inspired party make sure to check my boarding pass invitations to Paris, they were a hit at my daughter's party and I'm offering them now at my recently launched Etsy shop.  

Monday, April 11, 2011

~ Birthday Party ~ Maria Laura's Tea Party


I love every detail of Maria Laura's second birthday party.  Lucia from ideiachic and Maria Laura's mommy {another creative Milena J} designed  the most adorable tea party to celebrate  Maria Laura's two years old.   Just look at this gorgeous table set up and balloon backdrop:


The color palette for this party was pink and brown.  The Tea pot cake was adorable and  the tablecloth was adorned with hot pink bows and wooden spoons...
What a clever idea!  


Handmade cloth cherry cupcakes.   I bet you thought they were real?  I did at first.


The Party favors were little blenders and mixers and candy filled tiny jars.
 Aren't they cute?


All these treat boxes were made by Lucia using the Cricut machine.   


Tiny tiered cakes, petite cupcakes, miniature tea cups, little tea pots.  
This is the Sweetest Tea party!


Thanks Lucia for sharing with us. Simply Sweet!

Saturday, April 2, 2011

Giveaway Winner!! Customized Invitations by DelightfulPrints on Etsy

True Random Number Generator
1    
Powered by RANDOM.ORG
And the Winner is Great Gatherings! Post #1. 
Thank you all for taking part in our giveaway, keep tuned for more to come.
Next time, it might be you!

Friday, April 1, 2011

~ Party Recipes ~ Chicken and Beef Lasagna


Here is the recipe for my famously acclaimed Lasagna :)

Essentially to put the Lasagna together you need to have all of these ready:


1- Chicken:  Put 2 tbsp of extra virgin olive oil in a pot, add 4 Chicken breast skinless boneless and brown for 2 minutes {you can use bone-in chicken breast too, just be careful when shredding to remove all the bones}, add chopped vegetables {In the food processor blend 1 big onion, 3 garlic cloves, 2 tomatoes}, add salt and pepper {you can use as well poultry or roasted garlic and red pepper seasoning mix for extra flavour}, 1/2 chicken cube, and 1 cup of water. Cover and let simmer for about 20 minutes in low heat or until cook, just not overcook since this will be in the oven again we don't want the chicken to turn into rubber. Shred chicken, with all and vegetables, in the same pot using two forks.

 2- Beef:  In a pan, Saute 1kilogram of extra lean ground beef, with  vegetable mix {In the food processor add 1 onion, 2 garlic cloves, 1 sweet cubanelle pepper, 1 carrot and 1/2 celery stalk}  Salt and Pepper or use Montreal Steak Seasoning. Brown for 2 minutes then add 1 cup of Red sauce {Recipe below} and let simmer 20 min approx. in low heat. 

3- Red Sauce:  In a large pot saute 1 chopped onion for about 2 minutes, add 2 Strained or Pureed Tomato Jars, Water {Fill with water 1 of the tomato jars and pour in the pot}, Fresh basil leaves,  season with roasted garlic and red pepper seasoning mix.

4- White Sauce:  In a pot add 2 tbsp of butter, 2 can of Campbell's Cream of Chicken soup, 2 cups of Milk, bring to boil and let it simmer for 5 minutes in low heat

5- Cooked Pasta: I prefer to boil fresh pasta rather than using oven ready {It seems I always choose the hard way in everything I do, but believe me the result is different}. Another reason while I choose to boil the pasta rather than using oven-ready is because this way you can freeze your prepared lasagna to bake another day, however with oven-ready pasta the lasagna should go in the oven right away.  Use a big pot follow pasta instructions and don't boil more than 9 at the time, being careful to not to overcook. Save your cooked pasta in a Pyrex filled with cold water until ready to put lasagna together. {You'll  need at least 15 cooked lasagna pasta for each of the big aluminum pans like the ones shown in the picture above}

6- Shredded Mozzarella and Parmesan Cheese

7- Italian herbs seasoning.

Now that you have everything ready, you can put the lasagna together as follow: 
- Start with some of the white sauce in the pan
- then add the first layer of cooked pasta, just overlapping by 1cm. and cover the whole pan {5 cooked pasta should cover it}
- More white sauce
- Beef
- Red Sauce {be generous}
- Mozzarella cheese
- Second layer of Pasta {another 5 cooked pasta}
- White sauce
- Chicken
- Red Sauce
- Mozzarella Cheese
- Third layer of Pasta
- Pink Sauce: white and red sauce mixed :) 
- And top it all with mozzarella and Parmesan cheese and little bit {1 teaspoon of Italian herbs seasoning}

Cover with aluminum foil, put into preheated 350 degrees oven for 30-45 minutes and VOILA!! it is ready. 

Now if you want to freeze to bake another day instead, you can do so, just defrost overnight in the fridge before going in the oven, it might take a little bit longer than 30 minutes.  If your ingredients were hot when you put together the lasagna, let it cool down before freezing.  Now if you want to bake it the next day, don't freeze, just leave it in the fridge.


HERE IS YOUR SHOPPING LIST: 

Chicken Breast Boneless Skinless
Extra Lean Ground Beef
2 Jars of Strained or pureed Tomatoes
2 Tomatoes
3 White Onions
1 Carrot
1 Sweet Cubanelle Pepper
Celery
Garlic
Extra virgin Olive Oil
Fresh Basil leaves
Shredded Mozzarella Cheese
Parmesan Cheese
Milk
1 can of Campbell's Cream of Chicken Soup
Pasta for Lasagna
Italian Herbs Seasoning
Montreal Steak and Roasted Red Pepper Seasoning mix {optional}
Big rectangular Aluminum pan {just toss it in the garbage after the party}

Believe me it's not as hard as it sounds.  I really recommend making the lasagna days ahead before the party, freeze, and bake the day of the party. I think it even taste better this way.  I hope you make it and enjoy! If you do, let me know how it goes.  

Related Posts Plugin for WordPress, Blogger...